Stropping a gouge without rounding the edge
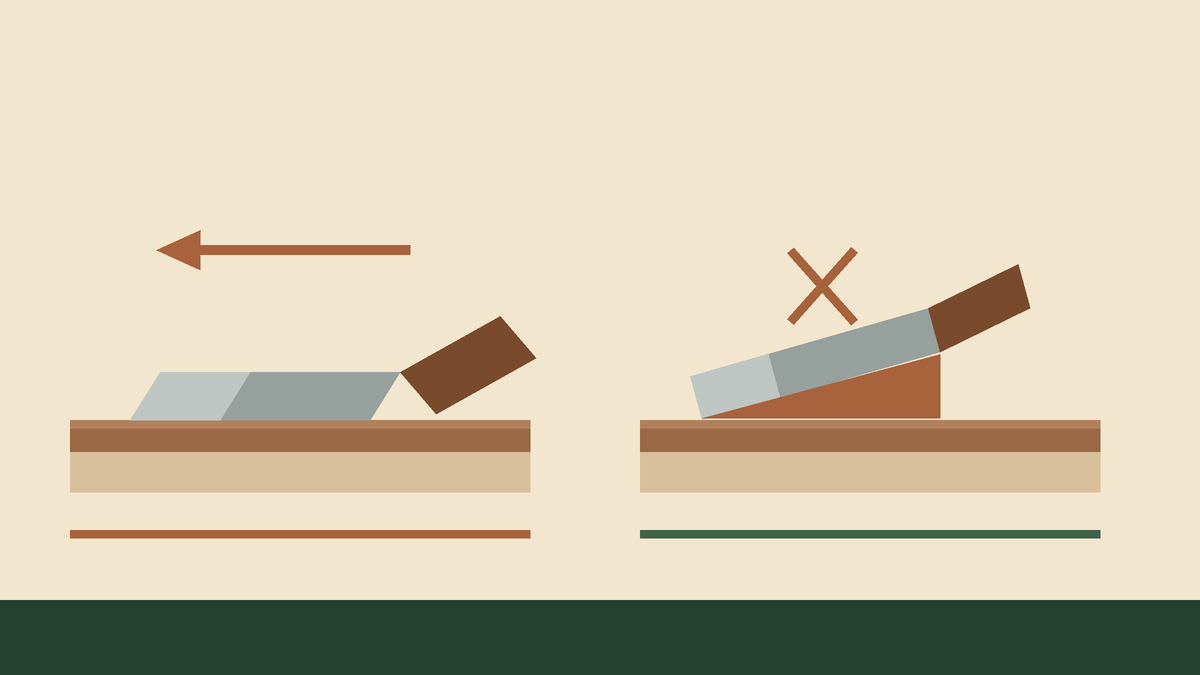
Stropping is the shortest and most misunderstood step in carving. Done right it keeps a tool cutting for weeks between visits to a stone. Done with the handle lifted a few degrees too high, it quietly rounds the very edge you are trying to preserve, and the tool gets duller the more you work on it.
What a strop actually does
A sharpened edge is not a clean intersection of two planes. Under magnification it carries a burr — a thin ribbon of steel folded over to one side by the stone — and a scatter of microscopic scratches left by the abrasive. Both make the edge feel sharp for a few minutes and then collapse.
The strop removes the burr and polishes those scratches out, leaving a smaller and much more durable edge geometry. The compound does the cutting; the leather is only a slightly yielding backing that lets the compound reach the bevel.
Setting up
- A flat piece of vegetable-tanned leather, roughly 60 x 250 mm, glued rough side up to a board. Rough side holds compound; smooth side does not.
- A bar of honing compound. Green chromium oxide at around 0.5 micron is the standard choice and is enough for every hand tool on the bench.
- For gouges, a second strop with a curved profile. A dowel wrapped in leather, or a strip of leather glued into a shallow groove routed in scrap, gives you a surface that matches the inside of the sweep.
Charge the leather by rubbing the bar across it until the surface goes evenly dark, then work the compound in with a thumb. Recharge when the leather starts to look bare rather than on a schedule.
The stroke
Lay the bevel flat on the leather. Not the edge, not the back of the tool — the whole bevel, so that both its heel and its cutting edge touch the surface at the same time. Then draw the tool backwards, edge trailing, along the length of the strop.
Always trail the edge. Pushing the edge forward into the leather digs in and takes a slice out of the strop, which is how most people learn this rule.
For a gouge, roll the tool as you draw it back so the whole sweep passes across the leather in one stroke. Ten to fifteen passes on the outside bevel, then five on the inside using the curved strop, and stop. Stropping is a finishing operation and more is not better.
The rounding you cannot see
If the handle lifts even three or four degrees during the stroke, only the very edge touches, and every pass rounds it further. The tool feels acceptable for a few cuts and then stops shaving.
The check: hold the bevel flat, then try to slide a sheet of paper under the heel. If it goes in, the angle is too high.
Knowing when it has worked
Three tests, in order of how much they tell you. The first is visual: look straight down at the edge under a bright light. A dull edge reflects a thin white line; a sharp one reflects nothing because there is no flat left to catch the light.
The second is the paper test — a sharp tool slices cleanly through a sheet held loosely at one corner, without tearing or catching. The third and most honest is the wood itself: a properly stropped tool takes a continuous shaving off end grain, which is the hardest cut in carving and the one that first fails as an edge tires.
How often
Every fifteen or twenty minutes of carving, before the tool feels blunt. That timing is the whole trick. A strop restores an edge that is slightly tired; it cannot rebuild one that has gone properly dull, and trying to make it do so is what sends people back to the stone every session.
Carvers who strop on a rhythm rather than on demand often go a year or more without touching a stone at all.